
This is a guest post by Charles Ouellet, co-founder of Snipcart.
If you’re reading this blog, you know static web development is trendy, to say the least. Unless you just got out of a years-long meditation retreat in a cave with no Internet. If that’s your case, well, hum, welcome back!
At Snipcart, our developer-first shopping cart platform, we’ve been diving into static site generators and related tools for 2+ years now. And we believe they are the next big thing.
A short while ago, a friend of ours gave an in-depth conference on why “static” is a bad word for the modern front-end stack, aka the JAMstack (JavaScript, APIs, & Markup).
And he’s right:
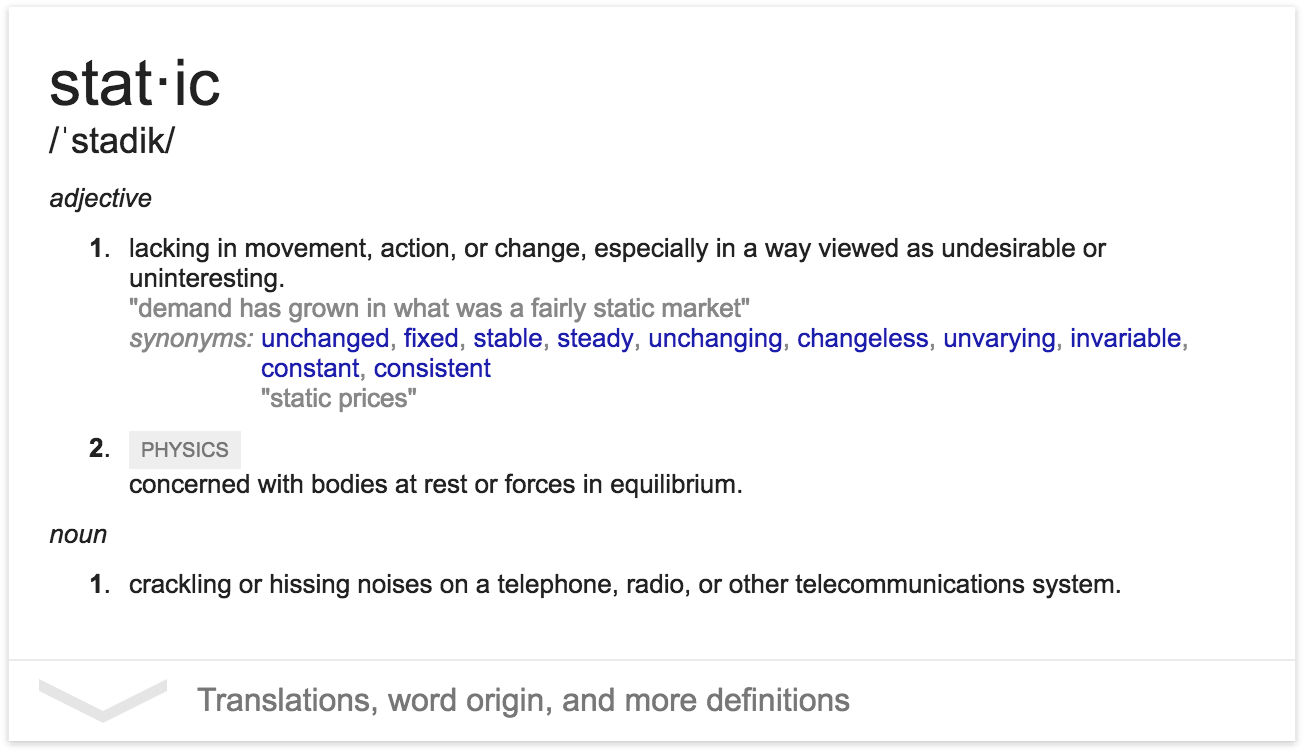
There’s nothing “undesirable” or “uninteresting” about the modern static websites & apps developers are pushing online. It’s in fact quite the opposite.
As a community, we need to give this new paradigm a name worthy of its actual value, and that’s exactly what the JAMstack is.
But this post isn’t a philosophical essay on the benefits of the API economy and the modular development approach. It’s about putting together a killer e-commerce workflow that ticks all of the boxes on the JAMstack checklist:
- Entire site on a CDN
- Atomic deploys
- Instant cache invalidation
- Everything lives in Git
- Automated builds
So today, I’m going to show you how to build an API-centric, fast and secure e-commerce project in 5 simple steps. And I’m going to use the right JAMstack tools to do so.
Let’s do it!
Starting notes
We’re going to use the following tools for our e-commerce JAMstack:
- Siteleaf, to manage our content
- Jekyll, to generate our static site
- Snipcart, to handle e-commerce
- React, to code a rich shopping feature
- GitHub, to host our Git repository & our site
For this post, we’re assuming:
- You’re comfortable with Jekyll’s static site generator.
- You’re able to work with both Git and GitHub.
- You understand the basics of React.
1. Create a website on Siteleaf
To handle the content management of our project, we will be using Siteleaf. If you didn’t know it by now, well, it’s a CMS that can be used to manage a Jekyll static website. It makes your life easier if you are developing a website for a client that isn’t tech-savvy. It also enables editing and adding content to the website without the use of tools like Git.
Start by creating an account on Siteleaf (they offer a free plan if your site is open source on GitHub).
We’ll need to link this site to a GitHub repository. I suggest you start by creating a new repo. Then, via Siteleaf’s dashboard, go to Settings. Click on the Sync tab and follow the steps to link your repository.
Siteleaf will automatically create a _config.yml file. This is the configuration file for a Jekyll site.
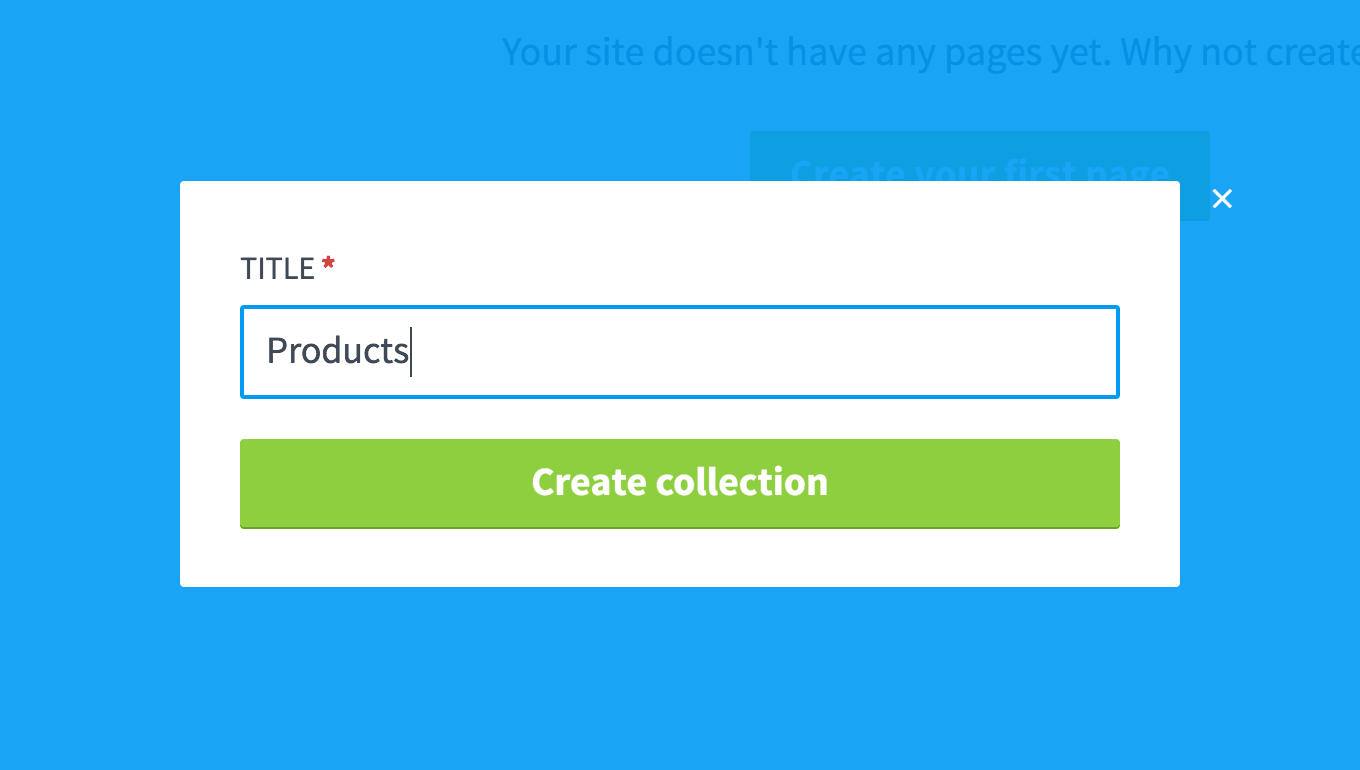
Once it’s done, we can start adding some content. Start by creating a new collection called “Products”.
We now need to add some default fields to an item in the Products collection. It’s not something that can be done via Siteleaf, so we’ll need to clone the GitHub repository and edit the _config.yml file with your favorite text editor.
We’ll start by adding snipcart_api_key and url settings at the same level as title and timezone. This will add two editable fields in Siteleaf’s dashboard: one for the Snipcart public API Key, one to set the root website path. It will be useful when working with Snipcart’s validation crawler.
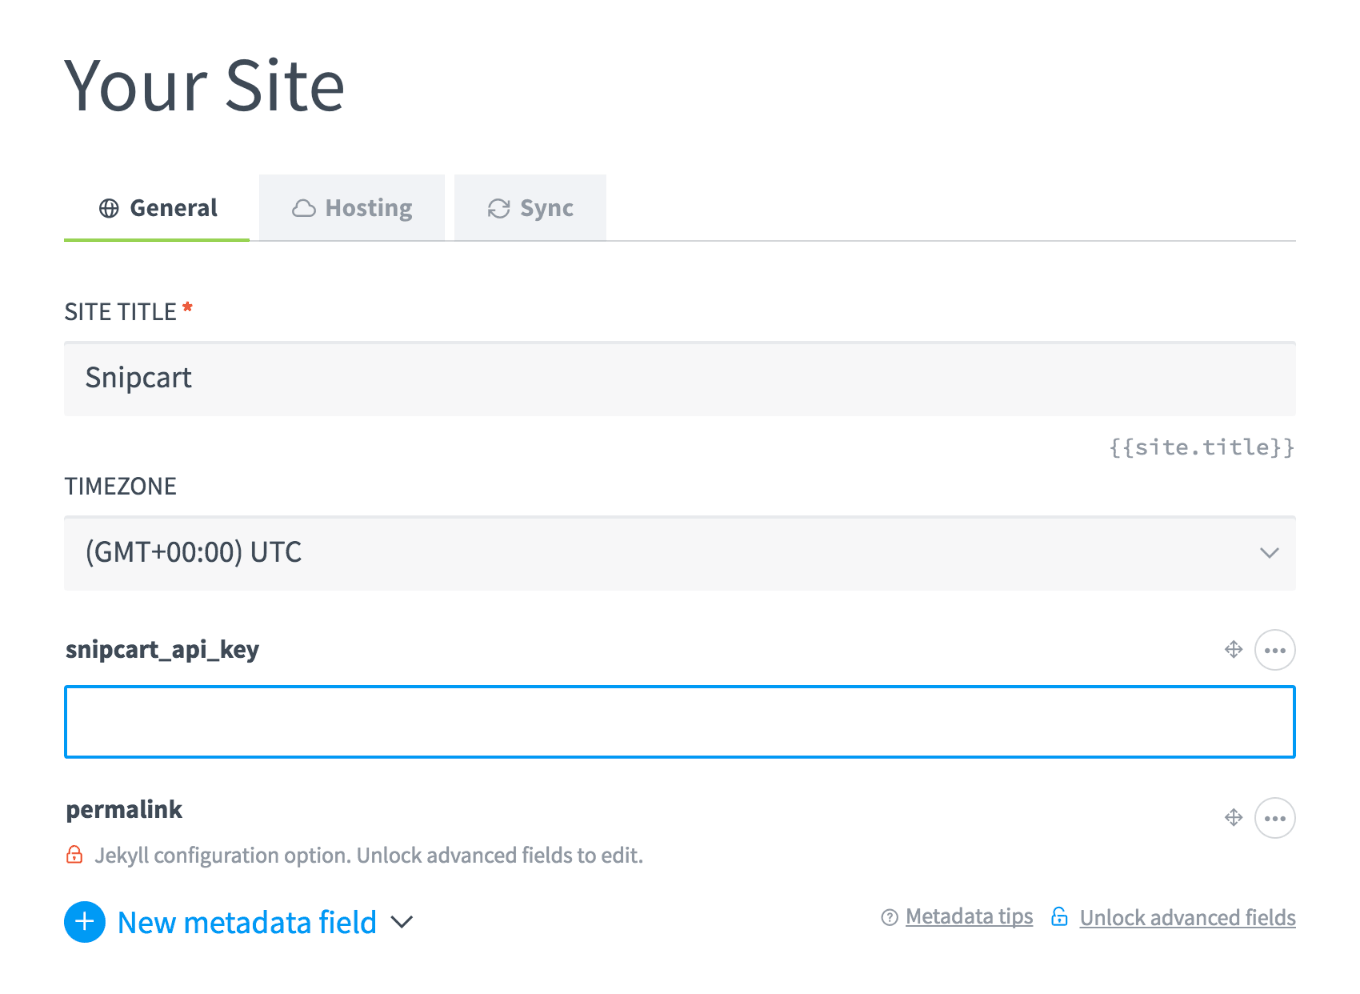
We’ll also add some fields that are required by Snipcart and that we want to be editable for the client through Siteleaf.
Here is our _config.yml file:
---
title: Snipcart
url: 'https://snipcart.github.io/snipcart-jamstack'
snipcart_api_key: ''
timezone: UTC
collections:
  posts:
    title: Posts
    output: true
  products:
    title: Products
    output: true
  uploads:
    title: Uploads
    output: true
defaults:
- scope:
    path: ''
    type: products
  values:
    layout: product
    permalink: "/products/:title/"
    name: ''
    price: 0.0
    sku: ''
    image: ''
    weight: 0.0
- scope:
    path: ''
    type: pages
  values:
    layout: page
permalink: pretty
Done? Simply push your changes, and Siteleaf will update automatically.
We can then create a new product by clicking on the + sign beside Products in Siteleaf. We’ll now have default metadata:

2. Add a shopping cart platform with Snipcart
Okay, it’s time to play with Snipcart a bit! So we now have the mandatory products meta-data. If we check the repo on GitHub, we notice that Siteleaf created a structure similar to the one we made in a previous post about a Jekyll + Snipcart integration.
For the next steps, we’ll clone the repository of the blog post above and copy the _includes, _layouts, _sass_ and css folders. Let’s also copy the index.html file.
We suggest you take a look at this commit to see which files we added.
Now let’s change the _includes/snipcart.html file a little. The setting we need to create to store the Snipcart API key is named snipcart_api_key instead of api_key. The new file looks like this:
<script src="https://cdn.snipcart.com/scripts/2.0/snipcart.js" data-api-key="{{ site.snipcart_api_key }}" id="snipcart"></script>
<link href="https://cdn.snipcart.com/themes/2.0/base/snipcart.min.css" rel="stylesheet" type="text/css" />
Here, we’ll also modify the product.html. We’ll specify the product’s absolute URL using the url field we first created.
<div class="product">
  <a class="product" href="{{ product.url }}">
    <img src="{{ product.image }}" alt="{{ product.name }}" class="thumbnail"/>
    <p>{{ product.name }}</p>
  </a>

  <button class="snipcart-add-item"
    data-item-name="{{ product.name }}"
    data-item-id="{{ product.sku }}"
    data-item-image="{{ product.image }}"
    data-item-url="{{ site.url }}{{product.url }}"
    data-item-price="{{ product.price }}">
    Buy it for {{ product.price }} $
  </button>
</div>
Let’s also update the productdetails file to make the necessary changes.
---
layout: default
head: snipcart.html
---

<div class="product-details">
  <img src="{{ page.image }}" alt="{{ page.name }}" class="thumbnail"/>
  <div class="product-description">
    <p>{{ page.name }}</p>
    <p>{{ page.content }}</p>
    <button class="snipcart-add-item"
      data-item-name="{{ page.name }}"
      data-item-id="{{ page.sku }}"
      data-item-image="{{ page.image }}"
      data-item-url="{{ site.url }}{{ page.url }}"
      data-item-price="{{ page.price }}">
      Buy it for {{ page.price }} $
    </button>
  </div>
</div>
You can take a look at the commit here for this part.
2.1 Customize the shopping cart
We also want to customize the shopping cart and make it match the website’s design. We wrote a blog post about this when we released the v2.0 of Snipcart. Our frontend lead crafted a simple custom theme that will match the look of our demo site perfectly. We suggest you take a look at the following post for details on simple and advanced cart customization: How to Customize Snipcart’s v2.0 Shopping Cart
For this tutorial, I chose the lazy option and used the file hosted on our demo for the customization example itself. I just replaced the snipcart.min.css file by the new one in the snipcart.html file.
<script src="https://cdn.snipcart.com/scripts/2.0/snipcart.js" data-api-key="{{ site.snipcart_api_key }}" id="snipcart"></script>
<link href="http://snipcart.github.io/snipcart-themes-custom/themes/simple/snipcart.css" rel="stylesheet" type="text/css" />
And it now looks much better!
3. Implement product ratings with a React component
Using Snipcart allows us to interact with its API and persist some data; something we couldn’t do with a static website out of the box.
Here, we want to allow customers to rate a product using a 5 stars system, a feature we often see in e-commerce websites.
To do so, we’ll create a small React component to add on each product page.
First thing to do here is to create a new file in the _includes folder named rating.html. This file will contain the code for the React component. Please note that the goal of this example is not to explain how React works, but mainly to show how to add a rich e-commerce feature to a static website. So we will not dive into bundling, Webpack and other things developers commonly use with React.
We’ll need to include React and ReactDOM. We can also add the Babel browser plugin to allow us to write the modern JavaScript required by React. So let’s include the three following files:
<script src="https://cdnjs.cloudflare.com/ajax/libs/react/15.1.0/react.js"></script>
<script src="https://cdnjs.cloudflare.com/ajax/libs/react/15.1.0/react-dom.min.js"></script>
<script src="https://cdnjs.cloudflare.com/ajax/libs/babel-core/5.8.23/browser.min.js"></script>
We’ll also create an empty div that will be the container of the main React component.
<div class="product-stars"></div>
For our use case, we’ll need two components. First one will be the product ratings system itself. This is the component that will fetch the data from Snipcart and persist it.
var ProductRater = React.createClass({
  getInitialState: function() {
    return {
      rating: 0,
      score: 0,
      votes: 0,
      message: null
    }
  },

  componentDidMount: function() {
    Snipcart.api.products.metadata(this.props.productId)
      .then(this.updateScore);
  },

  updateScore: function (meta) {
    if (meta && meta.score && meta.votes) {
      var rating = Math.round(meta.score / meta.votes);
      this.setState({votes: meta.votes, score: meta.score, rating: rating})
    }
  },

  starClicked: function(component, evnt) {
    var ratedOn = store.get('ratedOn:' + this.props.productId);

    if (ratedOn) {
        this.toggleMessage('Looks like you already rated this product.');
        return;
    }

    var e = evnt;
    var votes = this.state.votes + 1;
    var score = this.state.score + component.props.rating;

    store.set('ratedOn:' + this.props.productId, new Date());

    Snipcart.api.products.metadata(this.props.productId, {
      votes: votes,
      score: score
    })
    .then (this.updateScore)
    .then (() => {
      this.toggleMessage('Your vote has been recorded!');
    });
  },

  toggleMessage: function (message) {
    this.setState({message: message});

    window.setTimeout(() => {
      this.setState({message: null})
    }, 5000);
  },

  render: function() {
    var stars = []
    for (var i = 1; i <= 5; i++) {
      stars.push(<Star parent={this} onClick={this.starClicked} rating={i} key={i} />)
    }
    return (
      <div>
        <div>{stars}</div>
        <span className="flash-message">{this.state.message}</span>
      </div>
    )
  }
});
Using the Snipcart.api.products.metadata method will allow us to retrieve some metadata stored for a product. We will store the number of votes and the score of the products. With this information, we can easily calculate the number of stars a product has.
We’ll need to add a new component, Star. This one will show a star icon (we used Font Awesome here).
var Star = React.createClass({
  render: function() {
    var parent = this.props.parent;

    var className = "fa ";

    if (parent.state.rating >= this.props.rating) {
      className += "fa-star";
    } else {
      className += "fa-star-o";
    }

    return (
      <a className={className}
        href="#"
        onClick={this.props.onClick.bind(null, this)}></a>
      )
  }
});
Last step is to add the component to the DOM using ReactDOM.
ReactDOM.render(<ProductRater productId="{{ page.sku }}"/>, document.querySelector('.product-stars'));
Note that the code below will be added into a script tag with text/babel type in order for the Babel browser plugin to work.
<script type="text/babel">
  // React code goes here
</script>
Okay, now we have a rating.html file that will allow customers to rate products. But we’ll need to include it. In the productdetails.html file, we’ll add the following lines:
<div>
  {% include rating.html %}
</div>
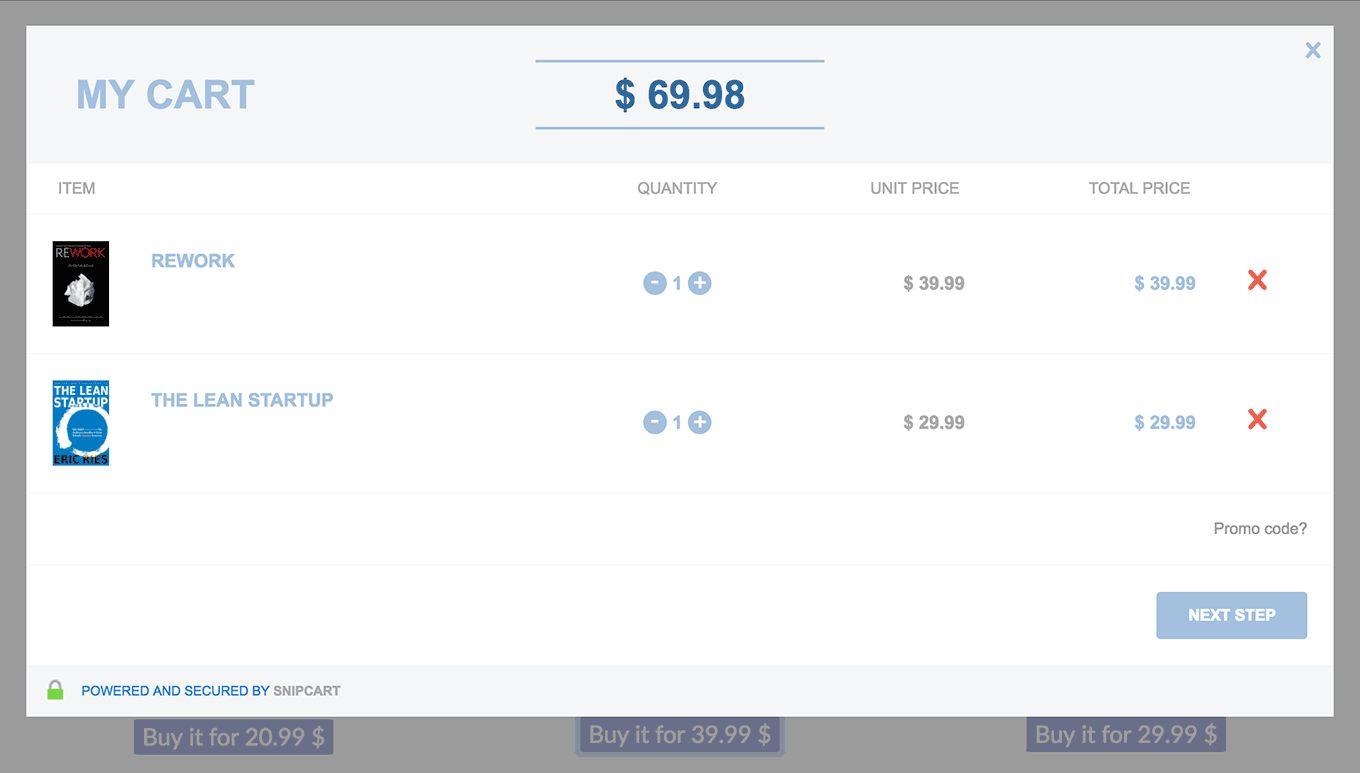
If we refresh the page, we should be able to rate a product:
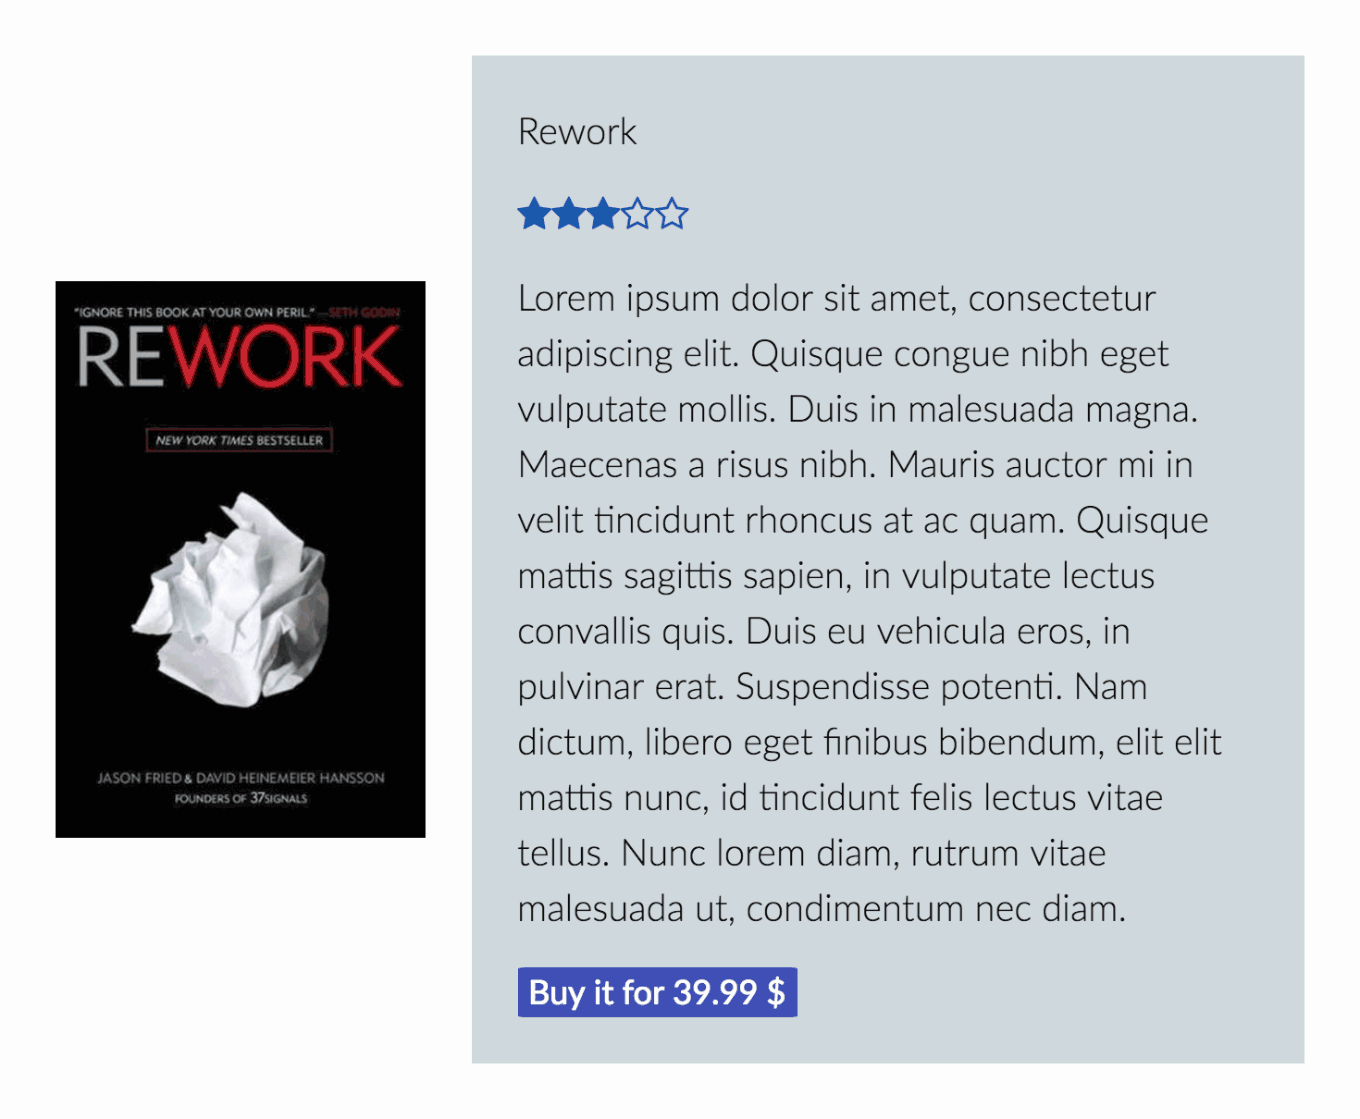
You can see the commit to add the React component here. You can also look at the whole files we created & modified to add this component:
4. Add the appropriate marketing & customer service tools
Running an e-commerce site comes with its fair share of marketing challenges and operations. We won’t delve into this whole universe too much here. Still, we thought it important to list a few third party solutions you can easily add to your e-commerce JAMstack site. The following tools might facilitate your clients’ chances of success with their online business:
- Google Analytics E-Commerce Tracking, to analyze audience specifics, track conversions & sales, and measure campaigns ROI.
- Mailchimp, to collect emails and generate more revenues with upselling and targeted campaigns.
- SumoMe, to grow your website’s traffic with a suite of free tools.
- Disqus, to improve content interactions with your customers.
- Intercom, to offer real-time support and communicate easily with customers.
5. Deploy & host website
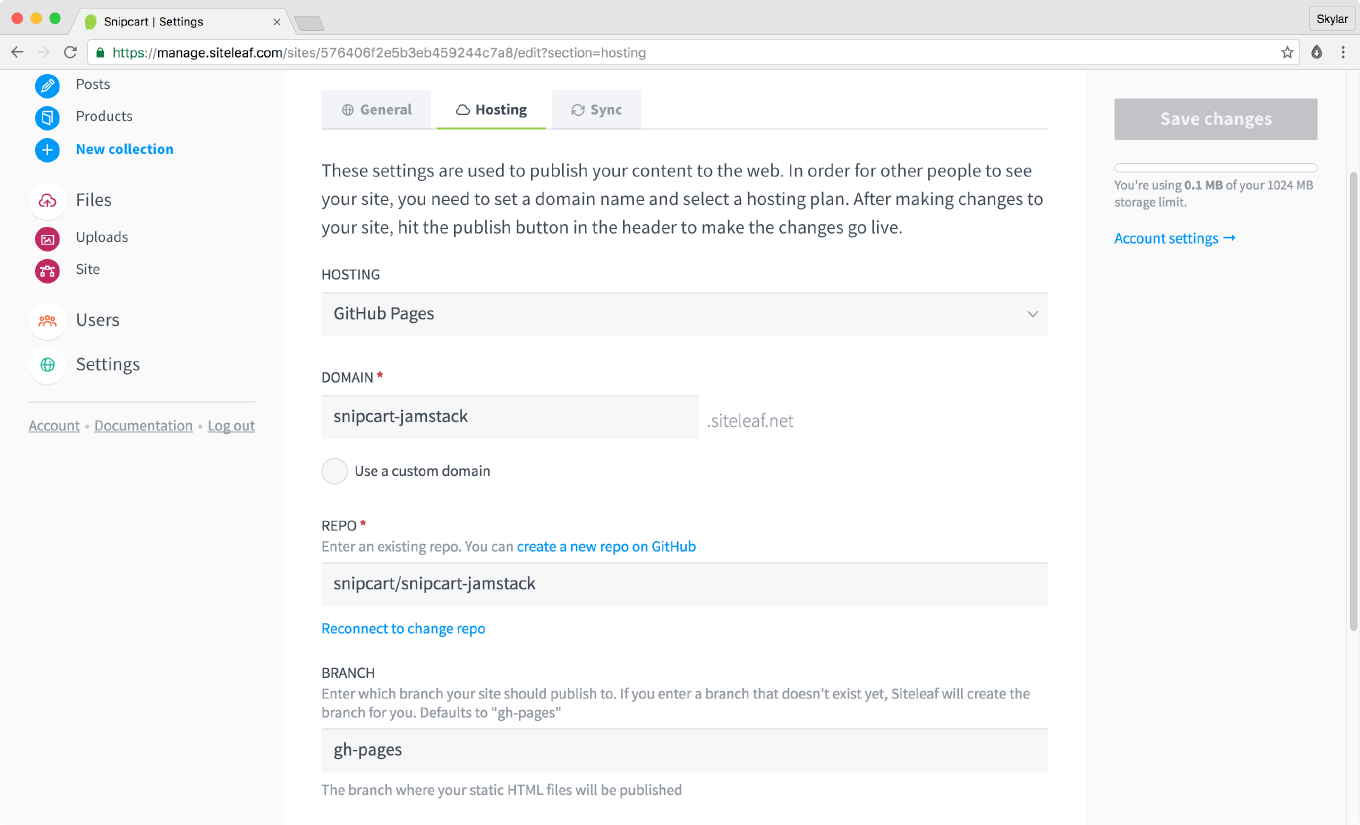
Siteleaf offers a variety of hosting options, but the fastest and simplest one is Github Pages.
Start by click on the Settings menu in Siteleaf’s dashboard, then open the Hosting tab. We’ll keep GitHub Pages as Hosting option and we’ll use the gh-pages branch.
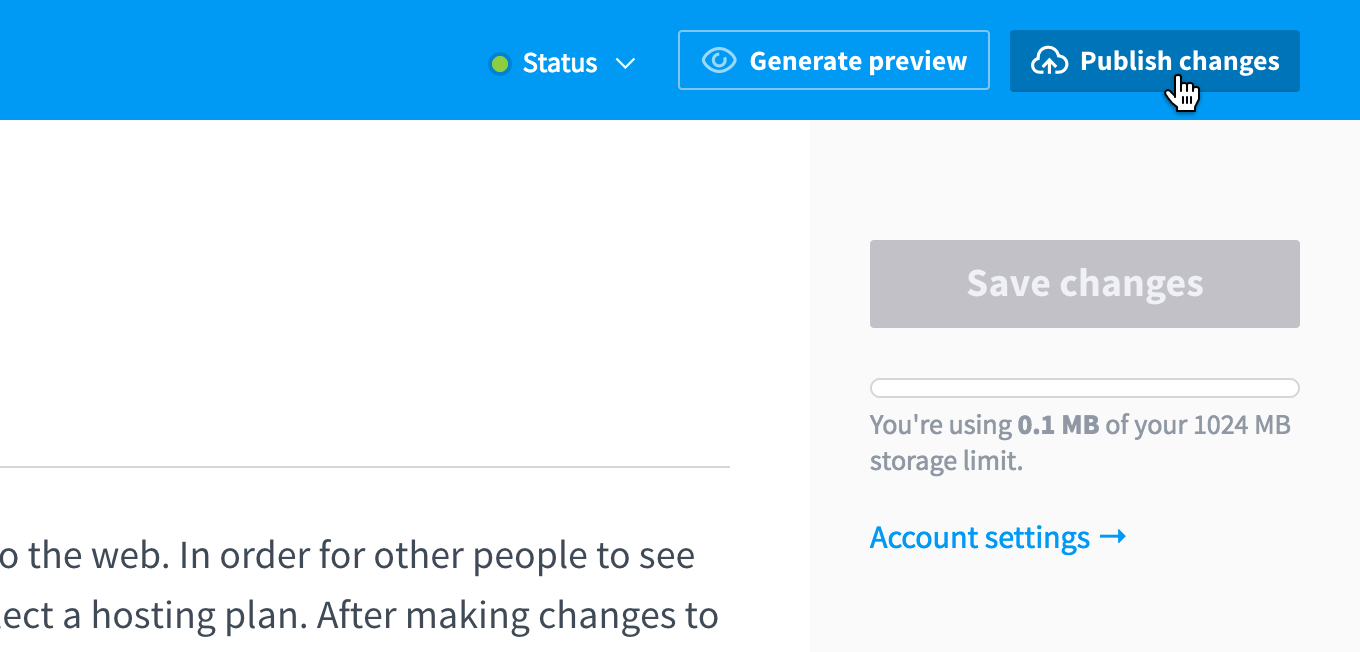
Once it’s done, we can just click on the Publish changes button located in the top right corner of Siteleaf’s dashboard. And we’re live!
We’ll also need to add snipcart-jamstack.siteleaf.net in Snipcart’s allowed domains (via the merchant dashboard).
You can see it the live demo for this post right here: http://snipcart-jamstack.siteleaf.net/
Conclusion
Harnessing the power of these developer-first web development tools was a lot of fun. If you follow this tutorial, you’ll have a fast, flexible and merchant-friendly e-commerce JAMstack site running in no time. It took me about an hour to make this setup work (agreed, I used a few pre-written lines for the site). But if you’re a Jekyll master, it could take you even less time!
The real fun part about modern JAMstack sites is you can pick the exact tools you need and bundle them together with Git. No more features bloat and software overkill: adopt a modular approach and you can call precise shots now!
I sincerely hope this article inspires other developers to get their hands dirty with JAMstack projects! :)
Charles Ouellet has been writing code and building apps for 10+ years. He’s the co-founder and lead engineer of Snipcart, a developer-first shopping cart platform. Good scotch and cool socks make him very happy. Follow him on Twitter.